
Curated indicator combos available at the strongest exclusive offers. Explore now →
Sale!

[AbsP] MEO #5: Origin Recoil + LOFI Supply/Demand
Original price was: $1,092.$350Current price is: $350.
This mashup is available at a special price for a limited time. Once it’s gone, it won’t be coming back.
Description
See where the strongest moves begin — Before the market confirms it
2 indicators. 1 reads momentum velocity. The other reads institutional intent.
Together: structural validity + momentum confirmation — on the same chart, at the same time.
The problem
You know your zones. But you still hesitate at the entry.
Because price touching a level tells you where — not whether it’s ready to move.
A slow drift into a zone and an aggressive institutional push into the same zone look identical on a standard chart. The outcome is completely different.
That’s the gap this combo closes.
What This Combo Does
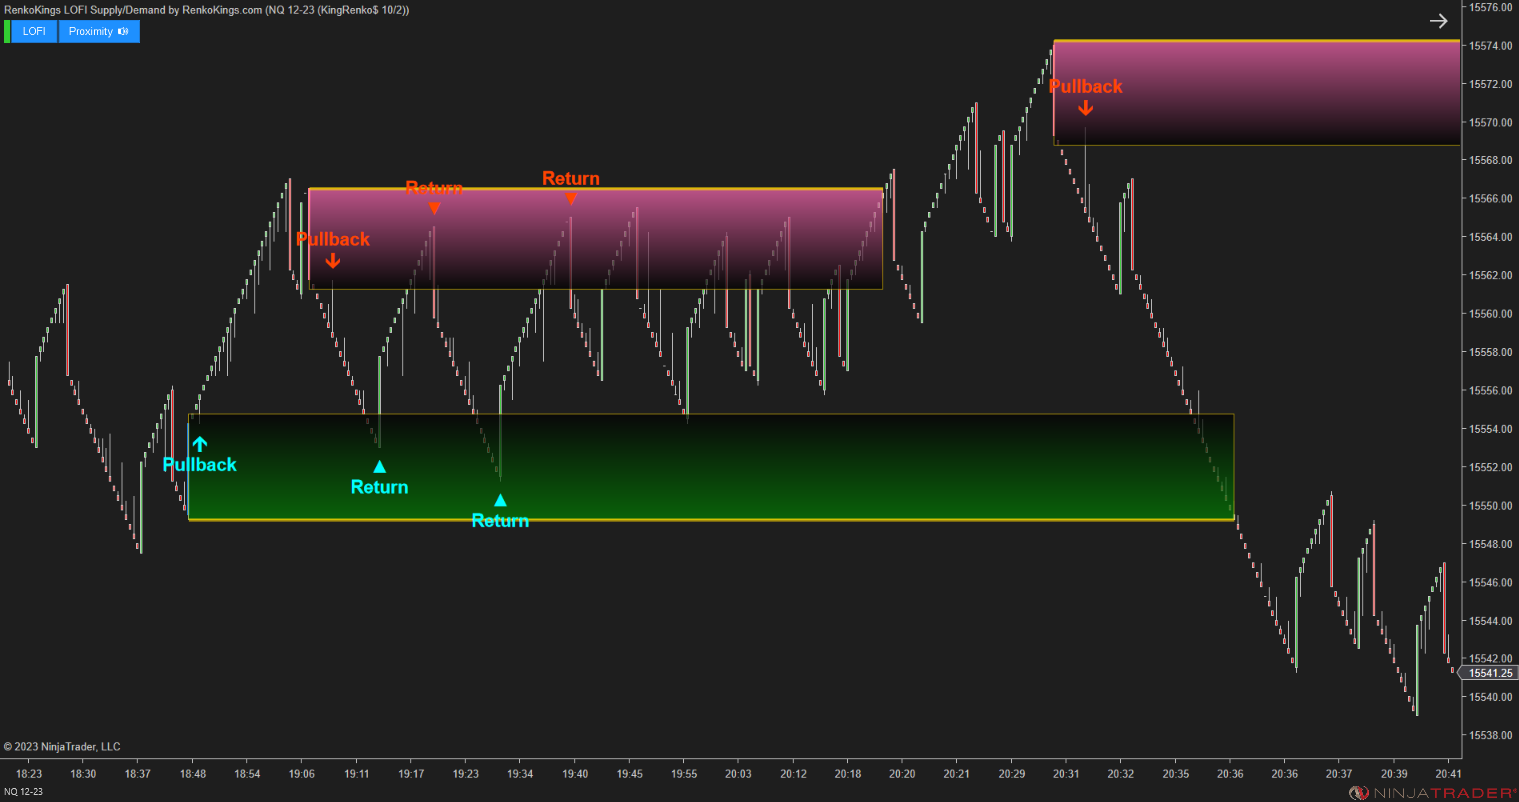
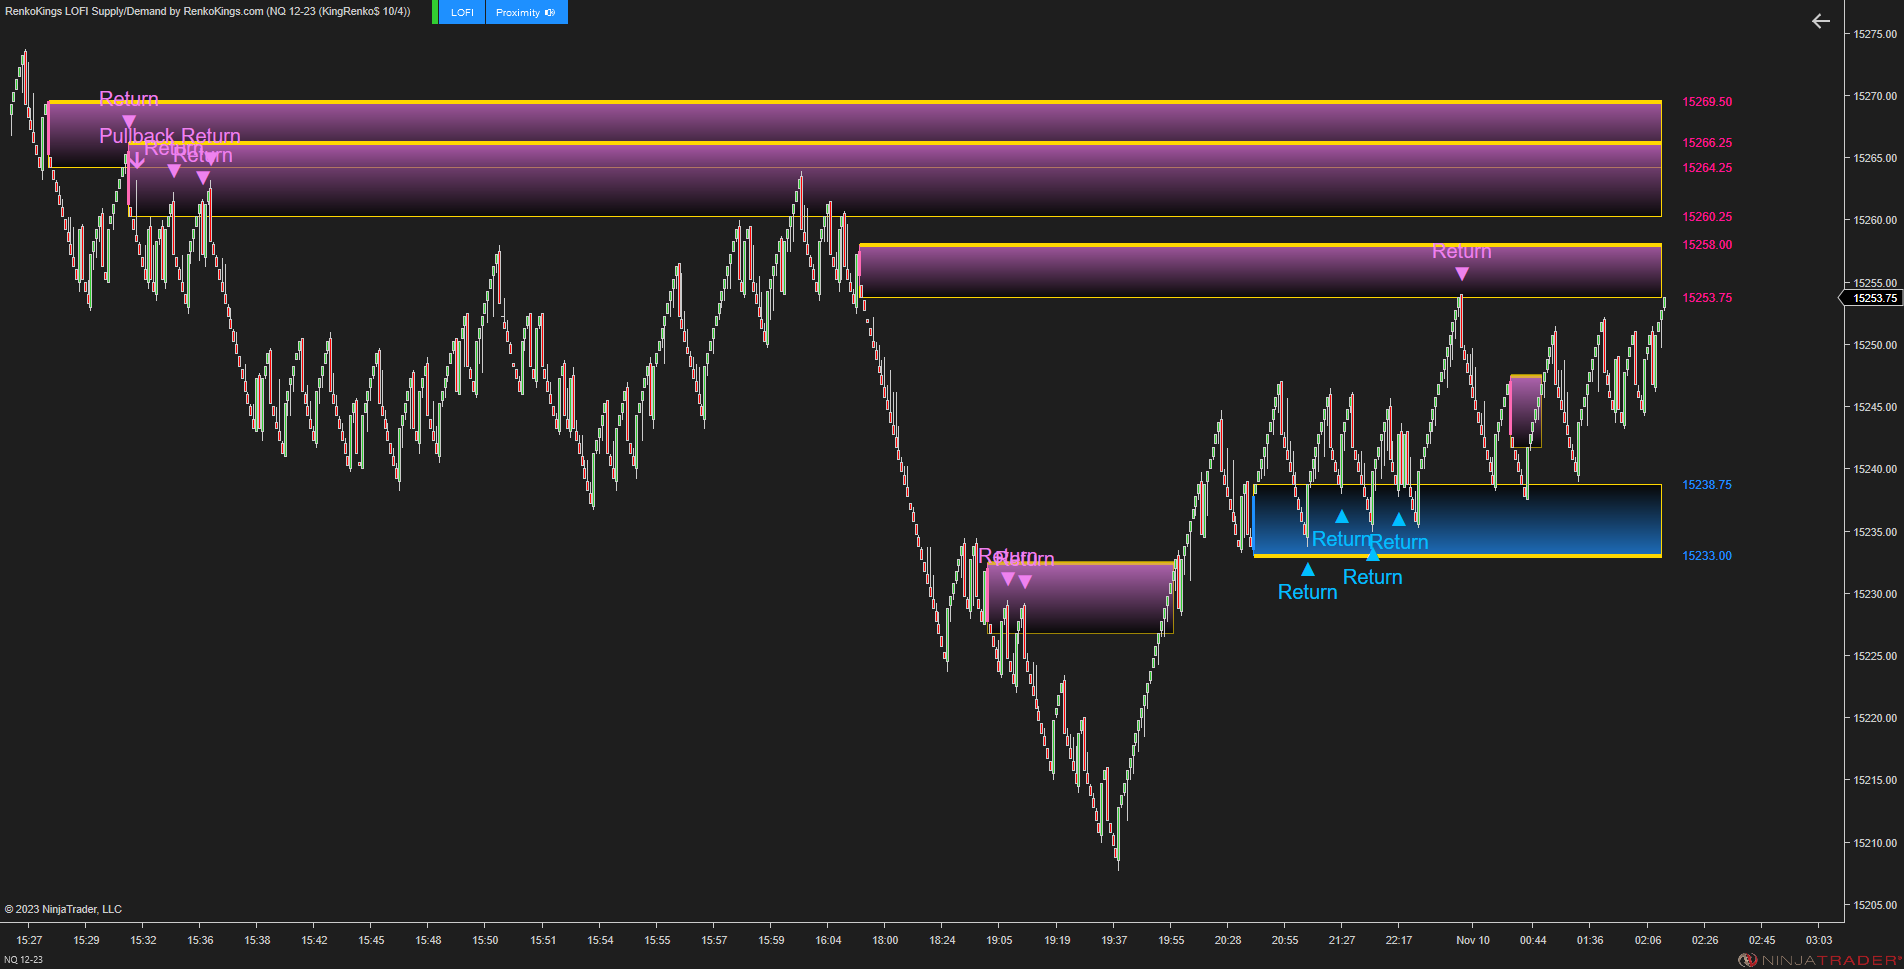
LOFI Supply/Demand maps where institutional activity is concentrated and generates structured signals directly on those zones

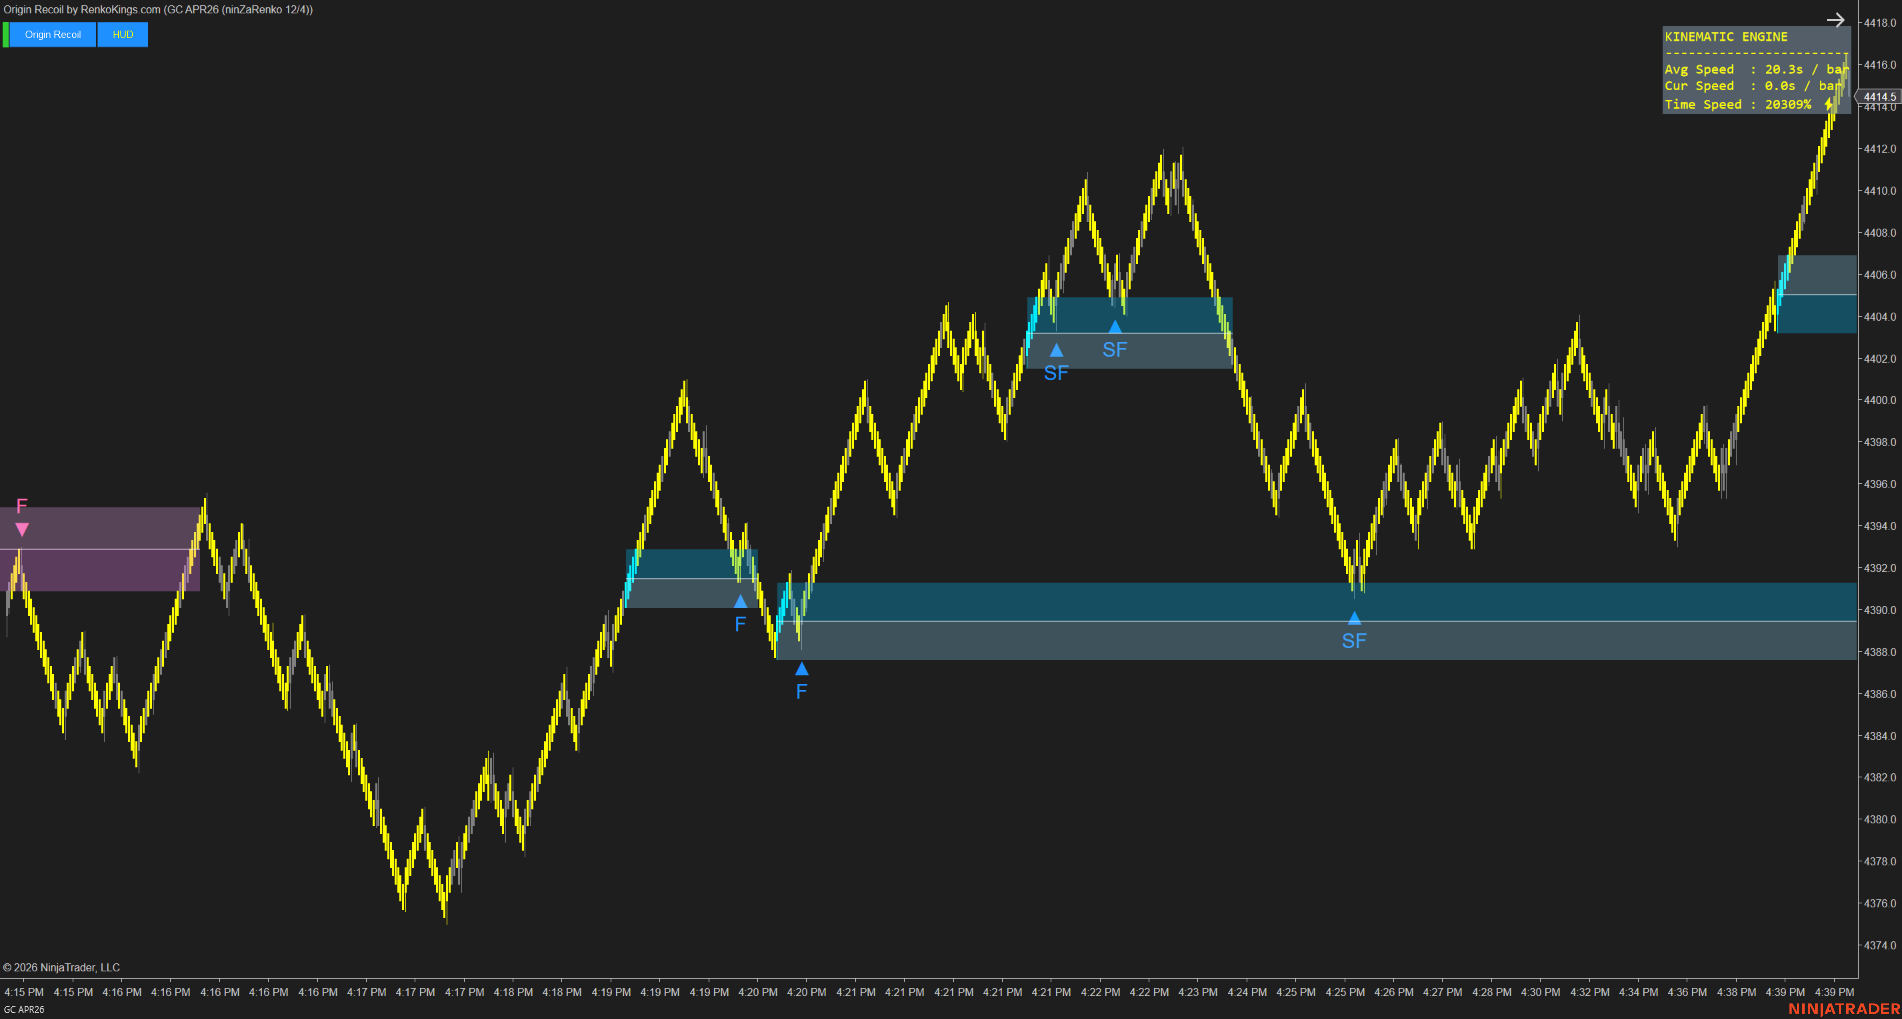
Origin Recoil monitors the speed of each Renko brick and tells you whether the move approaching your zone is aggressive or passive
Together, every signal you act on carries two independent layers of confirmation — structural validity from LOFI, momentum strength from Origin Recoil
One read tells you the level is real. The other tells you the momentum is there.
Why this combo works
LOFI Supply/Demand
Identifies where institutional activity is concentrated — the origin points of strong directional moves — and generates structured signals directly on those levels.
Origin Recoil
Measures the speed at which each Renko brick forms, compares it to recent market conditions, and tells you whether the move approaching that level is backed by real momentum or not.
When a Pullback or Return signal from LOFI Supply/Demand lines up with a Burst Zone from Origin Recoil, you’re not relying on one signal. You have two independent systems confirming the same opportunity — structural validity and momentum strength, at the same time.
Used separately, each is a strong standalone tool. Together, they remove the two most common sources of hesitation: uncertainty about the level, and uncertainty about the timing.
Benefits
- Stop second-guessing valid zones — When Origin Recoil confirms or denies the momentum, the entry decision becomes objective, not emotional
- Trade fewer setups, with higher conviction — LOFI filters for zone quality. Origin Recoil filters for momentum. The result is fewer trades per session, each with two systems behind it
- React faster in strong trends — Superfast Zone + LOFI signal on the same chart means you identify the setup in one glance, no switching between tools or timeframes
- Know when not to trade — No Burst Zone near a LOFI signal is a clear data-backed reason to stay out. Most traders take the signal anyway. This combo gives you a reason to wait.
- Native to King Renko — no adaptation needed — Both indicators are built specifically for this chart type. No workarounds, no translation layer.
Origin Recoil
Momentum velocity for Renko charts — the dimension standard charts ignore.
- Speed measurement: Tracks how fast each brick forms, in milliseconds, vs. recent baseline
- Burst Zone detection: Marks where participation shifted, not just where price moved
- 2-Tier classification: Fast Zone for structured pullback entries / Superfast Zone for immediate high-conviction reactions
- Internal momentum layer: Each zone splits into two halves. Second half faster = momentum accelerating. First half faster = already fading
- Retest signals: Fires when price returns to a Burst Zone, typed by zone class

LOFI Supply/Demand
Institutional-grade zones with built-in signal logic, native to King Renko.
- High-integrity zones: Only forms on a confirmed Reversal candle + two wickless confirmation bricks. Every level is structurally clean
- 3 signal types: Pullback (first wick touch, fast/high-reliability) · Return (reversal back to origin zone) · Break (zone invalidation)
- Low noise output: Strict filtering. Only the highest-opportunity signal per zone is shown
- Full alert Suite: Popup, sound, email, Alerts Log — all configurable
Special offer
- LOFI Supply/Demand: $500 value
- Origin Recoil: $600 value
Today get this combo for just $350
Related products
Sale!
Sale!
![[AbsP] MEO #10: Origin Recoil + Supply/Demand Discovery](https://renkokings.com/wp-content/uploads/origin-recoil-supply-demand-discovery-fedfcadxsadasd.png)
Sale!

Sale!
![[AbsP] MEO #11: Origin Recoil + Noble Cloud](https://renkokings.com/wp-content/uploads/origin-recoil-fvrsdgvdzsfcdxasdas.png)
Sale!
![[AbsP] MEO #12: Origin Recoil + Support/Resistance Radar](https://renkokings.com/wp-content/uploads/origin-support-resistance-jfd-500x500.png)
Sale!

Sale!
Sale!